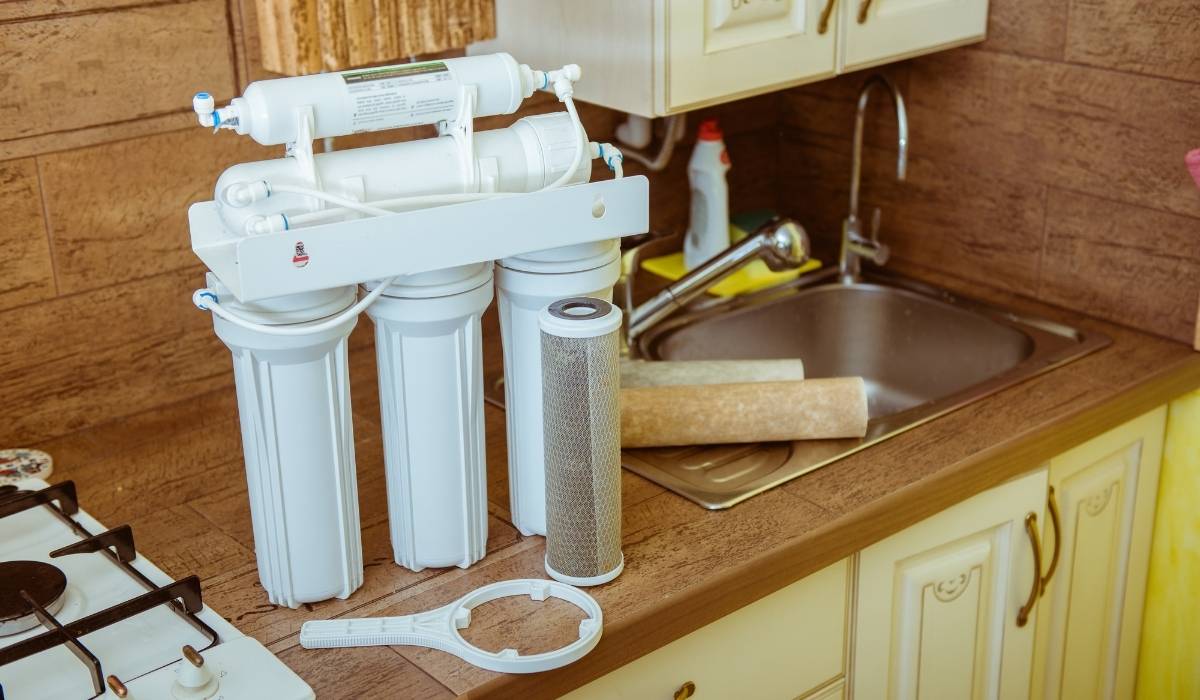
Troubleshooting Your reverse osmosis system can only be seamless and successful if you can initially identify and identify the root of the problem. All the components of your Reverse Osmosis (RO) system work together to provide pure and clean water. Because of this connection, a single issue could be caused by more than one part.
Troubleshooting your reverse osmosis system requires a systematic approach to eliminate possible issues. This reverse osmosis system troubleshooting guide will help you figure out the actual problem with your RO system and then teach you how to fix it.
This detailed and comprehensive guide will assist you in diagnosing and troubleshooting issues with your reverse osmosis (RO) water filtration system. So you can select from the list of the problems you’re experiencing, and we’ll provide a table of possible solutions.
Troubleshooting Your Reverse Osmosis System
- Troubleshooting Your Reverse Osmosis System
- How To Troubleshoot And Fix Your Reverse Osmosis System
- 1. Continued Draining Of The RO System
- 2. Low Water Pressure And Slow Flow From The Faucet
- 3. Water Has A Bad Taste
- 4. Air Gap Faucet or Drain Noise
- 5. Leaking Filter or Membrane Housing
- 6. Leaking System
- 7. Leaky Faucet
- Main Components Of The Reverse Osmosis System
- The Drain Saddle
- The Flow Constraint:
- The Check Valve
- The Storage Tank
- The Filters
- The Membrane:
- The ASO Valve (Automatic Shut-Off)
- The Feeding Pressure
- How Do You Troubleshoot A Reverse Osmosis System?
- Why Is There No Water Coming Out Of My Reverse Osmosis System?
- How Do You Fix Low Pressure In Reverse Osmosis?
- How Do You Check If The RO Membrane Is Working Or Not?
- Can An RO Membrane Get Clogged?
Please keep in mind that the explanations in this article are general guidelines, and we strongly suggest you talk to the owner’s manual for your RO system and a water treatment expert in your area.
How To Troubleshoot And Fix Your Reverse Osmosis System
If you are having problems with your reverse osmosis system, I strongly recommend that you call the service of a professional plumber to fix it for you. Or better still, study the owners manual to see if you can select the issue with DIY
Here are the seven(7) common problems you can troubleshoot with your reverse osmosis system and how to fix them.
1. Continued Draining Of The RO System
2. Low Water Pressure And Slow Flow From The Faucet
4. Air Gap Faucet or Drain Noise
5. Leaking Filter or Membrane Housing
These tables detail frequent RO system issues and probable causes and treatments.
1. Continued Draining Of The RO System
Pressure drives the operation of a reverse osmosis system. Simply described, feed water goes into the unit, where it is cleaned and stored in the storage tank for later use. When the storage tank reaches capacity, an automated shut-off (ASO) valve closes.
The valve prevents additional water from entering the system. The check valve prevents rejected water from flowing down the drain pipe.
Water may flow continually down the drain if tank pressure is too low or the shut-off valve or check valve is broken. This means that not only does your RO system waste a lot of water, but the noises it generates can also get very obnoxious after a time.
| Possible RO Problem | Possible Causes | How To Fix Them |
| 1. Reverse Osmosis System Is Continuously Draining | 1=> If you’re experiencing low incoming water pressure, | Increase the water pressure to at least 38 to 40 psi. |
| 2=>The automatic shut-off valve is not working. | Replace the automatic shutoff valve, paying attention to where the four lines are removed and reinstalled. | |
| 3=> If your RO system keeps draining, this may be an indication that the storage tank pressure is shallow or too low. | Check the air pressure in the RO storage tank—it should be between 5 and 8 psi when empty. | |
| 4=> If the issue is a ruptured or damaged RO storage tank bladder, | You have to replace the reverse osmosis storage tank. | |
| 5=> If the flow restrictor in the drain line has worn out, | If this is the issue, then replace the flow restrictor that matches the membrane capacity. | |
| If the problem is caused by improper membrane installation, | What you have to do here is to check the membrane installation instructions and install it properly. |
2. Low Water Pressure And Slow Flow From The Faucet
You’ve had your reverse osmosis system for a few years, and you’re about to sip a pleasant glass of filtered drinking water, just like every other morning. However, for some reason, the glass only fills halfway and the water flow slows to a trickle.
Little or no flow from the faucet indicates a low volume of water or low pressure.
| Possible RO Problem | Possible Causes | How To Fix Them |
| 2. Low Water Pressure And Slow Flow From The Faucet | 1=> It could be that the Pre-Filter Is Clogged | If this is the issue , then you have to replace the pre-filter. |
| 2=> It could also be that the Post-Filter Is Clogged | If this is the issue , then you have to replace the post-filter. | |
| 3=> Another cause of slow faucet flow is Low Air Pressure In The Ro Tank. | If this is the issue, then increase the pressure in the RO storage tank to 5, 6, or 7 psi. | |
| 4=>The RO issue above can be caused by Low Incoming Water Pressure (Min. 40 Psi). | If this happens, then replace the RO membrane. | |
| 5=> A Slow flow through faucet is sometimes cause by Fouled RO Membrane | If this is the problem with your RO system, then allow 4 to 6 hours for the system to fill. | |
| 6=> Yes, when you get a New RO System , Filters, or Membrane and it is not properly installed, it can lead to abnormal functioning. | If this is the case contact the manufacturer of the system. |
3. Water Has A Bad Taste
Most of the time, a bad taste or smell in water comes from a biofilm that has grown in one or more of the filtration stages. This can occur over months or years of use and may also result in cloudiness.
As a result, you should replace any clogged filters or a fouled membrane as soon as possible. And remember to replace these parts more often in the future (at least every 6 to 12 months for filters).
| Possible RO Problem | Possible Causes | How To Fix Them |
| 3. Water Has A Bad Taste. | 1.=> Bad taste in your water can be caused by Depleted Filters Or Membranes. | The problem of a depleted filter can be fixed by replacing and cleaning the system periodically. |
| 2.=> Bad taste in your water can also be caused by Fouled Membrane | The problem of a depleted filter can be fixed by replacing and cleaning the system periodically. | |
| 3=> Another cause of bad taste or smell in water is Stagnant Water. | To fix the issue of stagnant water that is causing a bad taste in your water, flush the entire system once or twice. |
4. Air Gap Faucet or Drain Noise
When you first turn on your system or replace one of the filter cartridges, you may notice weird noises coming from the drain line or air gap faucet.
This is nothing to be concerned about. The air being pushed out of the system causes it.
However, the problem should not last more than a few days. If the noise does not go away and is troubling you, make sure that all of the tubing is straight. A blockage in the drain tube or saddle might also generate noise. If that doesn’t work, it’s time to go over the entire system for gaps and flaws.
Troubleshooting Table For RO System Air Gap Faucet Or Drain
| Possible RO Problem | Possible Causes | How To Fix Them |
| 4. Air Gap Faucet or Drain Noise | 1=> A new system or recent filter replacement can be the cause of an air gap faucet or noisy drain in the reverse osmosis system. | If this happens to your new RO system, To fix this issue, just allow the system time and it will subside. |
| 2=> Noisy air gap faucet in the RO system might be caused by Bent tubing | To fix the issue of bent tubing in your RO system, you will have to straighten all water lines. | |
| 3=> Drain saddle or tubing restriction is another possible cause of Noisy air gaps in the faucet | To fix this restriction in the tubing is simple. Just try and unblock the tubing. |
5. Leaking Filter or Membrane Housing
Most of the time, a missing or worn-out rubber O-ring is to blame when a filter or membrane housing leaks.
Troubleshooting Table For RO System Leaking Filter or Membrane Housing
| Possible RO Problem | Possible Causes | How To Fix Them |
| 5. Leaking Filter or Membrane Housing | 1=> Misplaced O-rings: These are the most common cause of leaking filter or membrane housing. | Fixing the issue of a misplaced O-ring is simple and straightforward. To fix this, just reposition the O-ring. |
| 2=> A loose housing cap is another thing that could cause an RO filter or membrane housing to leak. | To fix this, simply retighten the housing cap of the RO system | |
| 3=> Damaged housing: Also, a leaking filter or the membrane housing of the RO might be caused by a damaged housing. | To fix this issue, you have to replace the damaged housing with another good house. | |
| 4=> Worn-out O-ring: When the O-ring of the RO system is worn-out, it tends to cause leakage in the filter and housing membrane of the system. | To fix this issue, you have to replace the worn-out ring with a brand new one |
6. Leaking System
Most of the time, it’s simple to figure out why a reverse osmosis system is leaking. Just check each and every connection to find out who did it.
Troubleshooting Table For RO System Leaking
| Possible RO Problem | Possible Causes | How To Fix Them |
| 6. Leaking System | 1=> Most often, the problem of leakage in the RO system is caused by Loose Connection | To fix this, simply tighten the loose connections on the RO system |
| 2=> When the RO system has a damaged connection, | To fix this, replace the the damaged connection |
7. Leaky Faucet
A dripping faucet means that one or more components of the system are not tight enough. To stop the leak, tighten all of the connections well. Push the tubing further into the drain saddle, valves, and ports.
If the leak is coming from the bottom of the faucet stem, the piece has to be replaced.
Troubleshooting Table For RO System Leaky Faucet
| Possible RO Problem | Possible Causes | How To Fix Them |
| 7. Leaky Faucet | 1=> A Loose Connection: A lost connection in the faucet can cause leakage in the faucet. | To fix the loose connection in the faucet is simple. Just tighten the knob and you are good. |
| 2=> Damaged faucet stem: A damaged faucet has been traced to be the major cause of leaky faucets. | The fix for the loose connection in the faucet is simple. Replace the stem with a new one and you are good. | |
| 3=> Clogged drain line (air gap faucets only): This can cause faucet leakage in your reverse osmosis system. | To fix this, unclog it |
Main Components Of The Reverse Osmosis System
The following are some critical components of the RO system that you should be aware of.
The Drain Saddle
Plumbing codes require backflow prevention on any cross connection (feed supply on one side, drain connection on the other) to keep drain or sewage water from backing up into the drinking water supply.
The Flow Constraint:
The flow restrictor offers resistance to the RO membrane while efficiently metering the water flow rate to the drain. It is sized based on the output rating of the membrane, and if it isn’t right, it stops membrane output.
The Check Valve
The check valve is installed at the output of the membrane permeate (filtered water). The check valve prevents the membrane from back pressure while also allowing pressure to rise when the tank fills, triggering the ASO valve.
Without it, the RO system cannot shut down, and backflow could cause the membrane to break.
The Storage Tank
The word “pressure tank” (hydro-pneumatic) refers to the type of storage tank utilized with RO systems. There are two chambers in the tanks: one for water and one for air.
The separating diaphragm extends into the air side when the tank fills with water, increasing the pressure on that side.
This pressure forces the water from the tank back out to the faucet or another point of usage. When there is a loss of pre-charge air pressure or diaphragm integrity, there may be little or no flow at the faucet.
The Filters
Pre-filters protect against sediment and chlorine. The flow restrictor might be damaged or clogged by sediment. By oxidation, chlorine can degrade the membrane material.
Postfilters let carbon pass through again on the way to your faucet, ice machine, or refrigerator.
The Membrane:
Pressure, which is the driving force that moves water through the system, is used by the RO membrane. Water production and TDS rejection will be negligible if there is insufficient driving force pressure. The rate of output is affected by input pressure and water temperature.
The ASO Valve (Automatic Shut-Off)
This equipment monitors the feed and tank pressures. When tank pressure reaches two-thirds of line pressure, the ASO valve closes hydraulically, stopping water flow.
RO systems have a drain flow that removes impurities. A drain saddle links the water line from the air gap faucet to the sink drain line.
The Feeding Pressure
The pressure of the water entering the RO system is critical to the system’s performance. It is important to look at how high levels of TDS and low pressure can affect how well a system works.
How Do You Troubleshoot A Reverse Osmosis System?
To troubleshoot an RO, you must check to see if the tank is full of water. If it’s complete, turn the faucet and measure the flow rate. If there is no flow, ensure the valve is open (handle in line with the tubing).
If everything appears in order, use a tire pressure tester to see if there is any pressure in the tank. If there is none, use a bicycle pump with the faucet to add stress until the tank empties.
After the tank has been drained, reduce the pressure to 5-7 psi. When checking for pressure, if water spurts out, the tank’s diaphragm has failed, and the tank should be replaced.
Why Is There No Water Coming Out Of My Reverse Osmosis System?
The pressure in empty reverse osmosis tanks should be 8 pounds per square inch. The water stored in the RO tank will not flow out of the faucets if the pressure inside the tank is too low.
If the tank pressure is too high, the water from the filters will not enter the RO tank.
To check the tank’s pressure, cut off the system’s feed water supply and drain the tank completely. Using a pressure gauge, determine the amount of air pressure in the tank.
How Do You Fix Low Pressure In Reverse Osmosis?
The water flow rate to the faucet will be impacted if your RO storage tank has low air pressure. When there is no water in the tank, the tank air pressure should be 7 to 8 psi.
Remove any water from the tank and look for the blue cap on the side of the tank that covers the Schrader valve. Use an air pressure gauge to check the tank’s air pressure.
If the pressure is too low, use a pump to inject enough air to bring it up to 8 psi. To avoid rupturing the air bladder, only add a little stand at a time.
How Do You Check If The RO Membrane Is Working Or Not?
A good grade conductivity tester (TDS meter) capable of reading tap water conductivity and permeate water conductivity should be used to determine the state of the RO Membrane correctly.
You can determine the state of the RO membrane with the help of a TDS meter. Ensure the RO system has been “ON” and make pure water for at least 10 minutes before running a diagnostic test on the RO membrane.
Can An RO Membrane Get Clogged?
Sediments and iron compounds clog the tiny pores of the RO membrane, causing damage and decreasing its life.
Another cause of early RO membrane breakdown could be improper equipment maintenance. Pre-filter cartridges should be changed every 3–6 months. Failure to take these precautions will result in membrane damage.
Ben Jordan has over 10 years of experience working in the water treatment industry and has a bachelors degree in water management. Water is his passion and in his free time he’s an aquarist that maintains large saltwater aquariums.


